RenterEase is reader-supported. When you buy through links on our site, we may earn an affiliate commission. Learn more
Choosing to exit the cloud ecosystem to run your own local AI server home labs or deep-learning nodes is a massive step toward operational sovereignty. You eliminate recurring token fees, regain data privacy, and can compile neural networks locally on hardware you actually own.
But the exact second you boot up a used enterprise 1U/2U rack server or a high-capacity PoE network switch inside a tight rental space, reality hits you hard. The tiny 40mm cooling fans inside those chassis are engineered for high-density corporate data centers—not your bedroom closet. To keep dense server chips from reaching thermal limits, these stock fans spin at 10,000+ RPM, emitting a piercing, high-frequency 65+ decibel scream.
Most generic home office decorating guides tell you to just throw the server inside a cabinet, shut the closet door, and live with it. That shallow advice completely ignores server fluid dynamics. If you block the cold air intake vents, your CPU and VRAM temperatures will skyrocket past safe thermal boundaries within minutes, causing severe thermal throttling, system drops, or permanent component degradation.
Worse, you cannot line your closet walls with cheap studio acoustic foam sheets or egg-crate foam. Hot enterprise equipment running continuous computational loads creates an immediate fire hazard when surrounded by cheap, combustible polymers.
To silence your hardware layout without triggering system failures or breaching your apartment lease agreement, you must use a careful engineering strategy. This uncompromised manual gives you the exact software hacks, physical modifications, and non-destructive acoustic baffle designs needed to make your home office silent while keeping your gear running safely.
1. The Acoustic Crisis: Managing 10,000+ RPM Home Lab Server Fan Noise in Rentals
To fix the noise footprint of an enterprise home lab server, you must separate your acoustic environment into two distinct mechanical problems: airborne high-frequency noise and structural kinetic humming. Treating them as the same problem is why standard acoustic modifications fail.
Airborne High-Frequency Whine vs. Floorboard Kinetic Humming
- Airborne Whine: This is the high-decibel “vacuum cleaner” scream caused by tiny 40mm or 60mm factory fans cutting through air at high velocities. This sound travels directly through the air, bouncing off bare closet walls and easily penetrating hollow-core apartment doors.
- Kinetic Humming: This is a low-frequency vibration caused by the mechanical spin of the fans and hard drive arrays transferring energy straight into the metal chassis framework. If your server rack sits flat on uninsulated closet flooring, this kinetic hum travels directly down your desk frames or floorboards. It turns your apartment floor into a giant acoustic sounding board, sending a deep drone down into the ceiling of the neighbor living below you.
To systematically fix your setup, you cannot rely on wall adjustments that damage property drywall or endanger your deposit. Instead, you must isolate the noise right at the hardware source.
While trapping airborne sound waves requires specialized internal enclosure modifications, stopping the lower floorboard resonance demands mechanical decoupling . Before editing your software or swapping hardware parts, ensure your server enclosure is resting directly on high-capacity isolation mounts. Using the best heavy duty anti-vibration pads for desks beneath your staging rack feet isolates that physical kinetic rumble at the floor layer, completely stopping low-frequency building drone before it travels through your apartment structure . Furthermore, ensuring your final workspace assembly configurations tightly align with official institutional safety standards, such as the OSHA Computer Workstations Ergonomics Guidelines, guarantees your drill-free room staging layout remains physically safe for high-density, multi-hour engineering runs .
Download the Spatial Infrastructure Master Pack
Running high-density server nodes inside standard residential rentals requires strict physical protection rules to safeguard your tenant security deposit. Before executing motherboard software overrides or altering cooling component wiring harnesses, ensure your workspace is fully decoupled and optimized for safety.
Enter your email address to download our official 4-page technical manual, containing:
- The 12-Point Apartment Deposit Protection Checklist: Concrete operational safety rules—including the 15-mm Rubber Neoprene Buffer Matrix—to fully isolate high-frequency equipment vibrations.
- The Approved Infrastructure Component Framework: Certified mechanical specifications for floor-to-ceiling axial compression columns, hollow-wall anchors, and weight density span limits to bypass fragile walls entirely.
2. The iDRAC & IPMI Override: Controlling Home Lab Server Fan Speed via Software Commands
The most efficient way to lower your home lab decibels is by using software commands to adjust system parameters directly, without spending a dime or touching a single tool.
Enterprise servers (like Dell PowerEdge or HPE ProLiant nodes) use a built-in motherboard processor called a baseboard management controller (BMC). This core tracks thermal parameters across your silicon layout.
By default, the moment you insert an unverified PCIe card—such as a consumer graphics card or a non-certified network controller—into the motherboard, the server’s automatic system management goes into an aggressive defense mode. The system assumes the unvetted card will overheat, so it overrides standard cooling settings and forces the internal fans to run at a permanent, loud 50% to 100% speed profile, even if your actual CPU cores are completely idling at 35°C.
Executing Command-Line Server Fan Speed Control Caps via IPMITOOL
You can safely override this factory automation by passing explicit manual control arrays over a standard network connection using an open-source tool called ipmitool.
Open your system terminal console and log into your server’s management interface (iDRAC/iLO) by entering your administrative security keys:
# Step 1: Enable manual fan control mode on the server core
ipmitool -I lanplus -H [YOUR_BMC_IP] -U [USER] -P [PASSWORD] raw 0x30 0x30 0x01 0x00

# Step 2: Manually set a fixed fan speed hex value (e.g., 20% speed value = 0x14)
ipmitool -I lanplus -H [YOUR_BMC_IP] -U [USER] -P [PASSWORD] raw 0x30 0x30 0x02 0xff 0x14
System Thermal Boundaries and Core Safety Margin Warnings
Manual software overrides give you immediate silence, but they remove the server’s automated thermal safety nets.
If you lock your fan speeds at a fixed 20% profile and then initialize a massive multi-hour model training shift, your hardware will rapidly overheat. You must run a continuous background script (such as an automated bash or Python daemon loop) that tracks core CPU/GPU temperature values every 10 seconds.
Configure your tracking script logic so that if any silicon component crosses a strict 75°C threshold boundary, the script instantly passes a raw automatic command (0x30 0x30 0x01 0x01) to return the server to safe factory cooling automation instantly.
3. Aftermarket Modification: Swapping Factory Blades for Quiet Server Fans
If software control overrides fail to quiet your server due to hardcoded firmware limits, you must perform a hardware fan swap.
Standard 1U and 2U enterprise server chassis use high-amperage 40mm x 28mm or 40mm x 56mm high-velocity fans that prioritize raw air pressure over noise control. You can physically remove these loud industrial fan blocks and replace them with high-end, near-silent Noctua NF-A4x20 PWM cabinet fans.
Splicing Proprietary Motherboard Pins Using Noctua OmniJoin Connectors
Enterprise motherboard headers do not use standard consumer 3-pin or 4-pin desktop fan connections. Instead, brands like Dell and Supermicro deploy proprietary 4-pin to 8-pin plastic connector housings with custom electrical wiring configurations.
Never try to force a standard consumer connector onto these proprietary motherboard pins. Doing so risks reversing the electrical ground and power leads, which can instantly short out your motherboard circuits or fry the fan’s motor core.
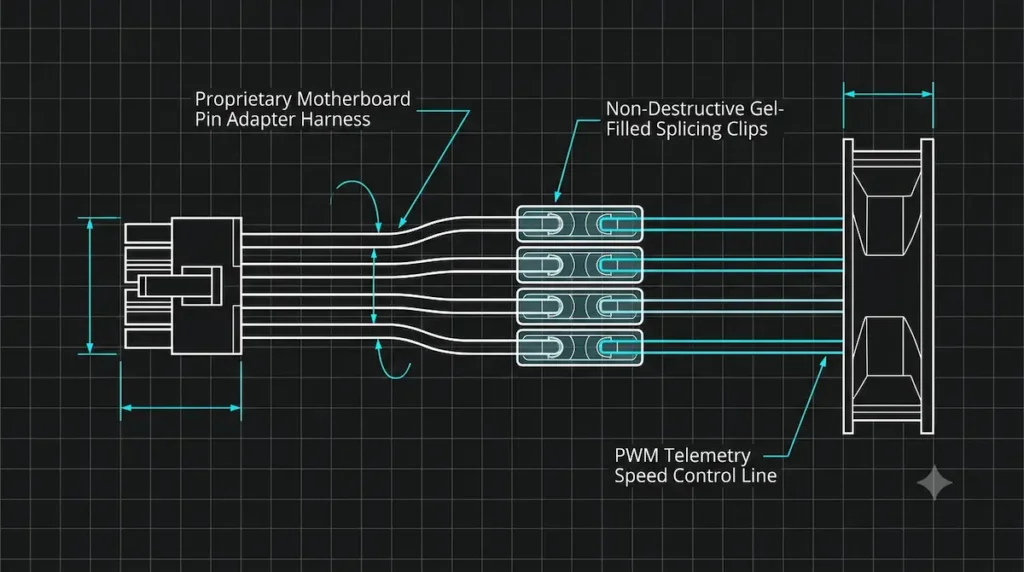
Instead, execute a non-destructive wire splice using the specialized Noctua OmniJoin adaptor system:
- Cut the wiring harness off your loud factory fan, leaving a clean 2-inch tail attached to the proprietary plastic connector housing.
- Strip the wire ends back to expose the clean raw copper leads.
- Slide the exposed wires alongside your new Noctua fan wires into the clear gel-filled OmniJoin splice clips.
- Press the colored alignment buttons flat with a pair of pliers to securely lock the wires together. The internal conductive gel seals the splice completely, protecting the connection from oxidation and shorts without needing electrical tape or messy soldering irons.
Cross-reference your specific server chassis manual to confirm the proprietary pin layout before locking the splice. Ensure your electrical ground maps to ground, your 12V power line connects to power, and the pulse-width modulation (PWM) path aligns correctly to preserve software speed controls.
🌀 SYSTEM CONFIGURATION NOTE
While swapping out stock blowers addresses structural noise at the component layer, housing your hardware inside a sound-insulated, rolling under desk server rack cabinet adds a critical layer of mass-law acoustic isolation .
4. Standalone Enclosures: Building a Quiet Server Rack Sound Baffle Box
If you run high-capacity 4U storage towers or enterprise rigs that cannot be modified with lower-speed fans due to strict thermal limits, you must isolate the noise using a standalone acoustic sound baffle box.
The main mistake remote workers make when building a DIY soundproof enclosure is sealing all sides flat. A completely sealed box turns into a literal oven, trapping heat signatures until your server shuts down from thermal overload. A professional enclosure must use an air-maze baffle pathway that lets fresh air circulate while trapping airborne noise waves completely.
Designing Soundproof Server Cabinet Maze Layouts with Mineral Wool
Sound behaves like a wave vector traveling through space. If high-frequency fan whine has a straight, open path out of an enclosure, the noise will escape completely.
However, if you force the air to travel through an S-curve maze path, the sound waves are forced to continuously strike the interior walls of the channel.
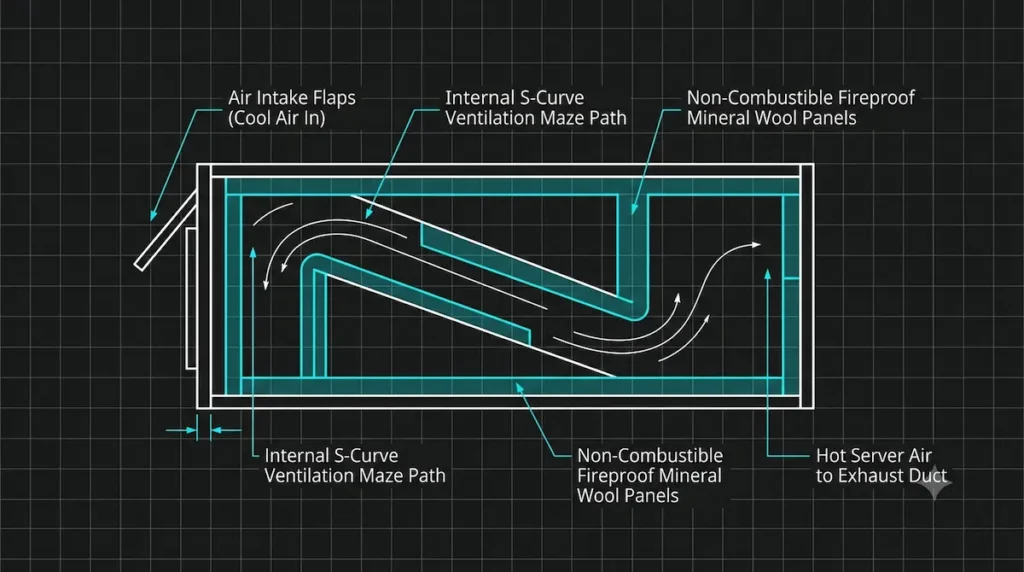
       AIR INTAKE FLAPS (COOL AIR IN)
       ┌───┐ ┌───────────────┐
       │   │ │               │
       │   └─┘   ┌───────┐   │  ◄── [Acoustic Foam Lining]
       │         │       │   │
       │   ┌─────┘       │   │
       │   │             │   │
       │   └─────────┐   │   │  ◄── [Internal S-Curve Maze Path]
       │             │   │   │
       └─────────┐   └───┘   │
                 │           │
                 ▼           ▼
        HOT SERVER AIR TO EXHAUST DUCT
To build a renter-safe baffle box:
- Construct an outer rectangular box frame using thick, dense 3/4-inch furniture plywood. Wood offers excellent mass density, which helps block low-frequency acoustic transmission waves natively. However, adding this structural mass drastically spikes your static weight footprint. Before staging heavy timber boxes, consult our dynamic standing desk floor protection mat manual to ensure you disperse downforces safely to avoid damaging underlying floor seams.
- Create internal divider baffles to form an airtight S-shaped maze path for the air.
- Line the interior walls of the maze channels with dense non-combustible mineral wool panels (such as Rockwool) wrapped in a breathable fabric cover. Never use flammable synthetic foams or open fiberglass panels inside your hot exhaust path. Mineral wool is completely fireproof, highly resistant to heat, and features a porous fibrous structure that traps sound waves and transforms them into microscopic heat energy, absorbing the fan whine completely.
Pair your enclosure directly with the air management systems from your master local AI server home labs configurations. Run an airtight, insulated flexible duct line from the back of the baffle box straight to a window panel insert to vent the hot air out of your apartment completely, keeping both your room temperature and your noise footprint perfectly secure. However, if standard air management boundaries hit a physical thermal wall under continuous multi-GPU workloads, you must scale up your infrastructure by deploying our advanced server liquid cooling home lab calculator to plot your exact external plumbing loop layouts, calculate serial pump pressure requirements, and monitor critical dew-point condensation lines automatically.
5. Home Lab Server Noise Reduction Matrix and Optimization Manifest
Use this quick-reference data matrix to balance your system’s decibel limits against your operational cooling requirements safely:
| Mitigation Level | Modification Strategy | Target Decibel Reduction | Primary Infrastructure Risk | Lease Compliance Rating |
|---|---|---|---|---|
| Tier 1: Software | Command-Line IPMI / iDRAC manual fan speed configuration caps. | 15 dB – 25 dB Drop (High Impact) | Core silicon thermal tracking drops if scripts fail under load. | Elite (100% Safe): Zero physical alterations or room staging modifications required. |
| Tier 2: Hardware | Physical factory blade removal; splice silent Noctua PWM fan modules. | 20 dB – 30 dB Drop (Maximum Quiet) | Motherboard error codes or reversed pin wiring short-circuit drops. | Elite (100% Safe): Hardware changes remain isolated entirely inside the owner’s server chassis. |
| Tier 3: Enclosure | External 3/4-inch plywood baffle box lined with fireproof mineral wool. | 10 dB – 15 dB Drop (Silo Support) | Restricted airflow volume traps heat if S-curve maze widths are too narrow. | Excellent: Free-standing structural load that requires no drywall drilling or wall changes. |
Secure Your Workspace Asset Architecture
Managing high-velocity thermal air currents, software IPMI controls, and aftermarket fan modifications will successfully silence your home laboratory footprint. However, long-term operational success requires continuous compliance with physical building limits to prevent structural settling, moisture drift, or localized drywall stress failures over time.
Claim your copy of the official Apartment Deposit Protection Checklist and Approved Infrastructure Component Framework to instantly lock down live hardware registries, certified tool listings, and non-destructive move-out restoration techniques natively.
About the RenterEase Acoustic Engineering Desk
RenterEase is an independent architectural workspace staging lab managed by remote software engineers and datacenter infrastructure designers. We analyze home office configurations through the strict lens of electrical load physics, hardware thermal dynamics, high-frequency sound wave mitigation, and non-destructive apartment property integration.
By completely bypassing superficial lifestyle decor trends and generic lifestyle roundups, our acoustic staging team provides raw, data-dense technical manuals engineered to solve severe environmental noise bottlenecks. Our single objective is empowering high-compute remote operators to run enterprise-grade local hardware stacks inside standard residential rentals cleanly—safeguarding your daily psychological deep-focus blocks while keeping your tenant security deposit 100% secure.
Affiliate Disclosure & Acoustic Procurement Policy
RenterEase is a data-dense, reader-supported platform built on absolute structural transparency. When you deploy workspace sound-isolation assets, silent aftermarket Noctua PWM cabinet fans, or fireproof mineral wool insulation layers through the curated tracking links across our technical manuals, we may earn a localized referral commission from our retail partners at completely zero additional cost to your account .
Our systems evaluation engine operates with absolute editorial independence. We exclusively highlight heavy-duty acoustic suppression gear, non-marring chassis mounts, and low-decibel airflow management components that satisfy our strict independent engineering standards for residential safety and landlord-compliant property restoration . These small referral commissions directly fund our independent acoustic testing lab operations, allowing us to continue building advanced, zero-damage spatial layout blueprints for remote hardware operators. Learn more about our property liability parameters in our global Terms of Use & Product Liability Disclaimers.
Technical, Structural, & Acoustic Safety Disclaimer
Experimental Infrastructure Boundary
The mechanical load-distribution formulas, command-line software control strings, wire-splicing configurations, and acoustic baffle layouts detailed across this manual—specifically regarding enterprise server fan speed overrides, aftermarket component swaps, and mineral wool air-maze enclosures—are provided strictly for general educational, instructional, and conceptual research troubleshooting documentation purposes.
Thermal & Hardware Performance Advisory
Enterprise server chassis and power supplies rely on specific high-velocity airflow volumes to protect multi-core processors and VRAM structures from structural breakdown. Manually capping fan RPM limits through IPMI commands, altering voltage pathways using aftermarket silent fans, or placing hardware inside standalone acoustic boxes introduces severe localized thermal risks. Restricting airflow volumes can trigger immediate core thermal throttling, system instability, data corruption, hardware component fatigue, or permanent physical equipment meltdowns. The reader bears absolute, sole responsibility for continuously tracking hardware core temperatures and managing system thermal profiles under peak execution loads.
Regulatory, Fire Safety, & Lease Compliance
Operating commercial-grade server nodes inside standard residential properties changes your apartment’s physical safety baseline. Encasing hot hardware in flammable synthetic padding or blocking built-in ventilation channels carries an inherent risk of thermal overload, permanent building wiring damage, or localized short-circuit fire hazards. Always verify your specific apartment breaker box limits against national electrical safety codes, utilize exclusively non-combustible soundproofing insulation like mineral wool, and comply fully with your physical lease agreement regarding temporary utility fixtures and local municipal noise ordinances.
RenterEase, its technical infrastructure editors, and its parent entities accept completely zero financial liability, technical diagnostic failure, or contracting responsibility for shorted circuit breakers, equipment damage, appliance data loss, structural building wire overheating, or tenant security deposit forfeitures incurred during independent room modifications. All technical testing, assembly adjustments, and hardware deployments are executed entirely at the user’s independent discretion.
Pingback: Local AI Server Home Labs: The Ultimate Safe Apartment Guide
Pingback: Home Office Power Circuit Calculator & Load Guide | RenterEase
Pingback: 5 Best Under Desk Server Rack Cabinet Setups for Home Offices (2026 Picks) - RenterEase
Pingback: Best Uninterruptible Power Supply (UPS) for Apartment Home Labs